This tutorial will focus on a technique tailored to expand the visible dynamic range of a single RAW file (as opposed to creating a HDR file or masking a bracketed sequence).
Most RAW editors has several tools to do just that built-in, but often you can not achieve your desired end result without complicated Photoshop work and masking techniques. In this tutorial, I’ll share some of my secrets for expanding the dynamic range of a single RAW file.
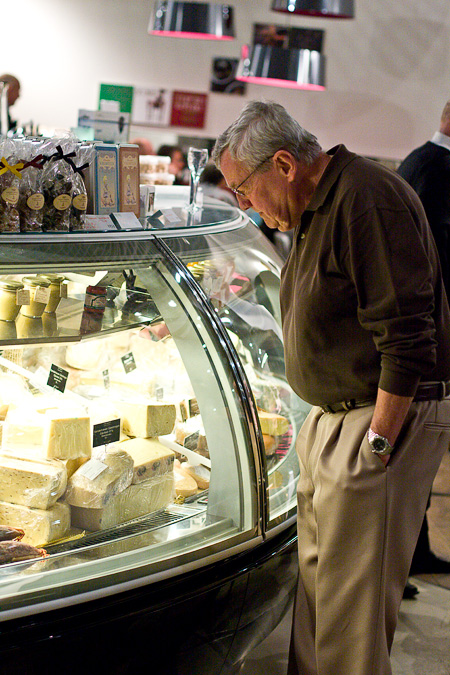
Observe the following photograph:
This image is from a Canon 40D RAW file developed with Adobe’s Camera RAW 5.2. As the original image was underexposed, out of necessity to keep the highlights in range, I’ve added a positive exposure compensation to brighten the shadows, in turn leading to a clipping of the highlights. Even with tricks like Curves, Fill Light and Highlight Recovery, I cannot both expose the shadows as I want them, and also get great highlights – at least not without an unintentional hit in contrast in the process. My opinion is that neither Fill Light or Highlight Recovery are perfect in ACR, as by affecting the left or right third of the histogram respectively, they are both too broad, and don’t go far enough. – And they don’t give you precise control over the tonalities you effect.
Let’s look at my technique for dealing with this problem. For this tutorial we will be using ACR 5.2 as our RAW developer on a PC, as well as Photoshop CS4. The beauty of this technique is that it offers a more or less automated, lets call it ‘intuitive’, way of expanding your dynamic range without delving into Curves and complicated masking for every problem shot.
1 ) Develop your RAW image in ACR only for the shadows (left side of histogram). That is, concentrate on getting good shadow separation, and let the highlights blow for now (that means do not even try to recover the highlights, don’t touch the Recovery slider, better to let them blow out).
2 ) When satisfied, hold Shift key, and click ‘Open Object’ in ACR to open the image in Photoshop as a Smart Object.
3 ) In Photoshop, right-click the SO layer, and select ‘New Smart Object via Copy’.
4 ) Double-click the thumbnail of your new SO layer, to bring up the ACR dialog again.
5 ) This time, develop for the highlights (right side of histogram), and ignore the shadows (left side of histogram). Typically for this technique, there’ll be around 2 stops of difference between the two versions. Essentially this is just a matter of dragging the Exposure slider to the left.
6 ) Click ‘Done’ when satisfied that all highlights are recovered.
7 ) In Photoshop, now hide the top layer, then go to the Channels Palette and Ctrl-click the RGB channel thumbnail to select the highlights of your lower, lighter layer. What you’ve got now is a so-called Luminosity Mask.
8 ) Go back to the Layer Palette, turn on your top darker layer (select it if it isn’t selected), and click the ‘Add layer mask’ icon.
9 ) You should now see a composite of the two layers that will have expanded dynamic range, but also will look a bit lifeless and with poor contrast.
10 ) To add local contrast, you need to select your Layer Mask, and add Filter>Blur>Gaussian Blur. How much depends on a number of factors, including file size and detail frequency in your image. Typical key figures for Amount are in the 90-127 range. However, for some images, such as the sunset example in the end of this article, you may need to go as low as 1! This is up to your best judgement, and needs some experimentation and careful examination to set right for every image. You’ll want to achieve natural contrast and at the same time avoid visible halos and artifacts. Note that what you are doing here is essentially how Unsharp Mask worked in the dark rooms of yore. Only this digital equivalent is much, MUCH easier.
11 ) Finally, you may need to adjust the tonalities affected. You can do this by adding a Curves adjustment (Image>Adjustments>Curves) to the Layer Mask. Typically, you want to darken the mask a bit, by creating a point in the middle of the curve and dragging down about 2/5th of the way. You may also use other tools and adjustments on the mask to localize the effect – all non-destructively.
12 ) For a final kicker, now press Ctrl-Alt-Shift-e to create a new composite layer on top of the others, then add Filter>Sharpen>Unsharp Mask, Amount: 6-12, Radius: 90-127, Threshold: 0, to add a bit of extra local contrast. Typically I overdo this a little, then immediately go Edit>Fade to 66%. Alternatively, you can set the layer opacity of this composited contrast layer as you like.
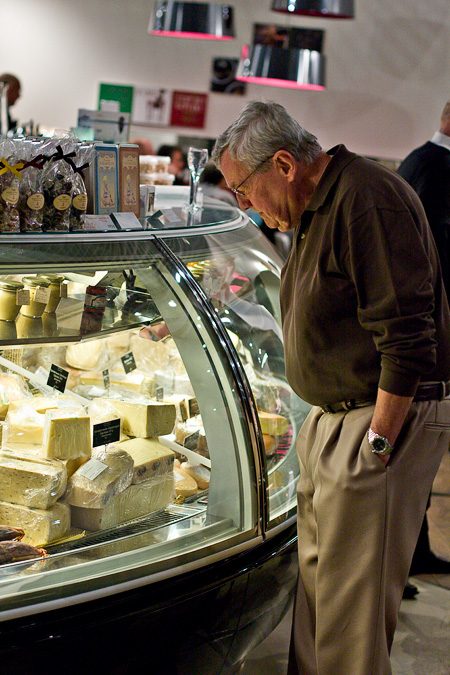
End result:
Disclaimer: What you see above is no miracle cure for blown highlights. You will still need to expose your photo in a way so that all data can be recovered, and you might have to take care of increased shadow noise from pushing the shadow end.
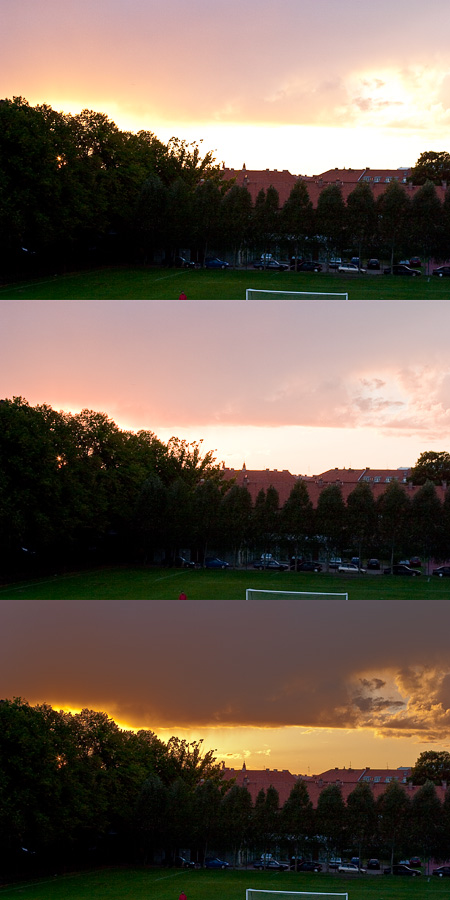
Here’s another example comparing ACR’s Highlight Recovery to this method:

Dynamic Range expansion - top: image developed for the shadows, middle: Recovery at maximum in ACR*, bottom: my method
* Recovery at 100, with positive exposure compensation of +2. A closer approximation of ‘my method’ could be achieved by maxing out both Recovery and Fill Light in ACR, leaving Exposure slider at 0, but doing so introduces nasty edge artifacts and very low contrast.
Enjoy!
I’ve compiled this technique into a Photoshop action, which you may download and study here.
Copyright 2008 Mathias Vejerslev


Richard Southworth said,
December 3, 2008 at 6:15 pm
Mathias,
Wonderful technique, however one observation/question. I found creating the luminosity mask from the top (darker) layer and applying it to itself also seemed to work well, and had a less “damaging” effect upon the entire image.
What’s the downside of doing such?
Richard Southworth
imagingpro said,
December 3, 2008 at 6:49 pm
Thank you for your comment, Richard.
Depending on the image, using the Luminosity mask from the darker layer on itself will often fail on images that are far apart in exposure, leading to washed out areas and artifacts. The idea is that if you create the Luminosity Mask from the lighter layer, blown highlights are 100% selected, so the blown part of the image will be 100% taken care of, gradually diminishing the effect toward the shadows, creating a seamless transition mask.
PECourtejoie said,
December 4, 2008 at 12:15 pm
Thanks, Mathias! and thanks for sharing the “why” in your tutorials, it is much more educational!
Lawrence Hudetz said,
December 4, 2008 at 5:31 pm
Hi, Mathias
One unfortunate problem (which is also true using Unsharp Mask as you indicate here.).
If you have an image with a bright sky, say semi-overcast and have a very dark object such as a fir tree jutting into that space, you will generate a halo around the tree which gets progressively worse as you attempt to drop the sky values further, or use that unsharp mask. It seems to be function of the degree of Gaussian Blur applied. My image needed 250px of blur to restore values in the landscape itself.
imagingpro said,
December 4, 2008 at 6:03 pm
Lawrence, for a situation such as the one you describe, I would use a very low Blur Radius. The sunset example above was accomplished with a blur value of 1 – just enough to mask the transition from one layer to the other. If that means you don’t get enough contrast, you can either add contrast in the darker layer (assuming you use the Smart Object workflow, you can do this at any time) or do it afterwards like usual, say via a curves adjustment.
You could also use a very large radius, and then use CHOPS (short for CHannel OPerations – the art of masking), to create a better mask around problematic areas – this is the good thing about having the mask ready available.
Richard Southworth said,
December 4, 2008 at 6:20 pm
Mathias,
Ok, I’m convinced, need to generate the mask from the lighter layer. However, I did come up with a variation that made life a little easier in terms of adjusting the final image.
I created a third smart object, a copy of the lighter layer, and brought the Blacks slider up to 50 or so. I used this layer to generate the luminosity mask and discared after applying the mask to the darker layer. Seemed to give a quality result, and the final composite was closer to desired brightness and contrast.
imagingpro said,
December 4, 2008 at 6:23 pm
Richard,
You can accomplish the same thing in the Curves step on the mask, just adjust the shadow clipping. You can do this either before or after the blurring step.
Lawrence Hudetz said,
December 4, 2008 at 6:42 pm
CHOPS? Can you expand on that? Where do I find it?
Richard Southworth said,
December 4, 2008 at 6:44 pm
Mathias,
Yes, I tried that also, appeard to me the Blacks in ACR provided a slightly smoother result. Not sure their algorithm is quite the same as clipping in curves or levels, may have something to do with working in linear space.
Or I may just be fooling myself, in any event your total process is a winner.
imagingpro said,
December 4, 2008 at 6:54 pm
Lawrence,
The expression CHOPS comes from a book called ‘Photoshop Channel Chops’ by David Biedny, Bert Monroy and Nathan Moody.
The book is unfortunately out of print and is more or less outdated, as it pertained to Photoshop 4. However the general advice in this book is gold, and as you can see from the above link, used copies sells from $80 and up.
It basically means anything you do on a channel (a mask), as opposed to working on an RGB layer.
To combat halos, you could
a) Use a low radius Gaussian Blur in step 10. Apply extra contrast to the final image if needed.
b) Create a soft mask containing the halo (I’d use Quick Mask with a soft-edged brush) and apply a curve to the layer mask to kill the halo.
c) Use Dodge and Burn tools on the mask.
d) Use Burn tool set to highlights on a flattened copy of your image.
kostik said,
December 8, 2008 at 5:00 pm
cool
Howard Owen said,
December 12, 2008 at 3:18 am
Hi Matt,
Nice tutorial. I’ve used a variant of this method for a while and I find it useful. I’ve erred maybe in not making full use of the technique as an end in itself as I usually combine it with HDR or some form of more complex layer blending. It looks like I’ve been making the whole process way too hard.
I look forward to eventually having CS4 and the ability to use the Smart Object option in ACR.
Well done.
garyb50 said,
December 13, 2008 at 6:48 pm
Mathias,
Great tute. Just played with it & it was pretty straightforward & seamless. BTW, I’m using CS3 and Smart Object worked.
I would like to point out that Kai Krause coined the phrase ‘CHOPS’ back in ’90 or ’91 with his amazing “Kai’s Power Tips and Tricks for Adobe Photoshop,” which I devoured using Pshop 3 on an SE30 B&W Mac with 30 megs of RAM.
cheers,
gary
imagingpro said,
December 17, 2008 at 7:48 am
Great comments. Maybe it was Kai that came up with that expression.. Chops. Certainly could sound like him. One of our great, great photoshop gurus.
Dave said,
August 14, 2009 at 10:48 pm
Many thanks for action – the first sampls I have tried have worked very nicely. Now to fine tune my understanding and use of this action / technique. Thanks again.
Chad said,
September 11, 2009 at 5:56 am
Awesome tutorial, thanks so much for providing the action as well!
Lynn Ross said,
November 13, 2009 at 1:12 am
Thanks for the tutorial I’m happy with the results of this on a photo that I didn’t think I would be able to save, it didn’t resolve all of the problems but made it so that I liked the results.
Lynn
elav said,
December 10, 2010 at 9:32 am
What a great tutorial! Your effort to help others is much appreciated.
Andrew Hart said,
April 8, 2011 at 9:30 am
Just asking to be notified about follow-up comments and requesting an email subscription.
Great article, BTW. I have many images which might benefit from your technique.
Brian said,
September 26, 2012 at 8:50 am
Hi, sorry but the link to the action doesn’t work for me. Following the instruction I couldn’t get it to work up till now, thats why I wanted the action. This is a very simple method which elegently overcomes the ghosting problem that can occur in HDR shots, therefore I’m very interested. Thanks very much. Brian